
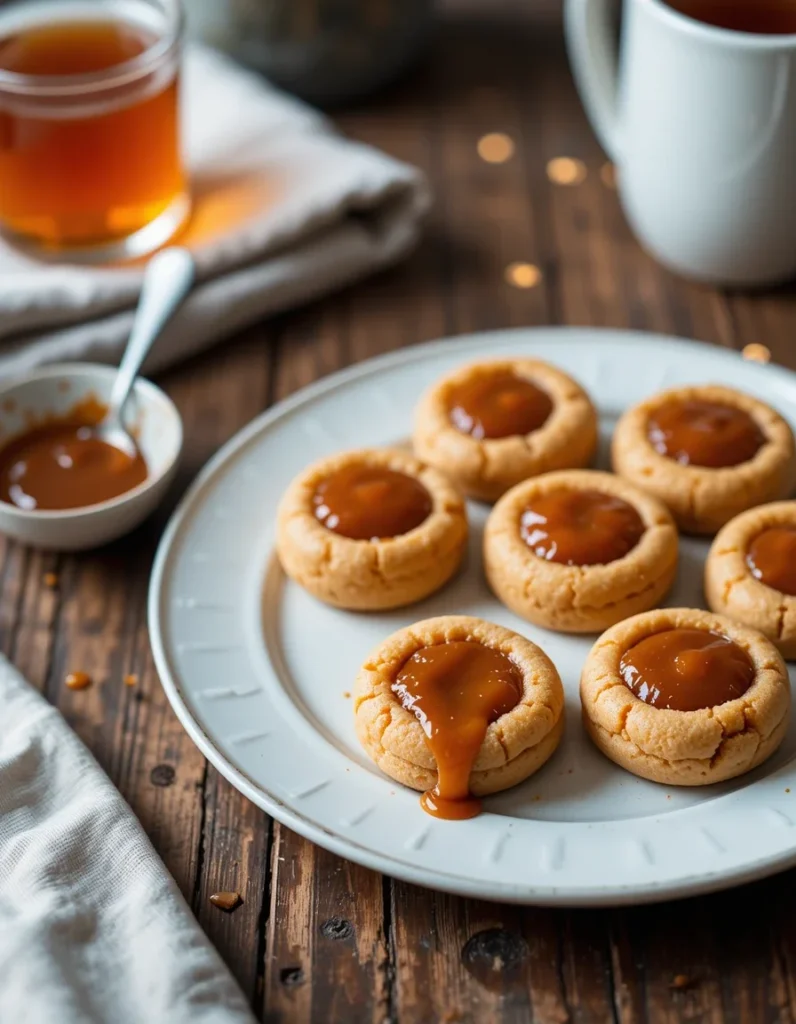

Sticky Toffee Pudding Thumbprints blend the rich, caramel flavors of sticky toffee pudding with soft, chewy cookies. These treats feature a spiced dough filled with gooey toffee sauce, offering warmth and sweetness in every bite. Perfect for holidays or cozy gatherings, they bring comfort and nostalgia. If you love sticky toffee pudding, this easy twist will quickly become a favorite dessert.
History of Sticky Toffee Pudding Thumbprints
Origins of Sticky Toffee Pudding
Sticky toffee pudding is a classic British dessert that first gained popularity in the 20th century. It features a moist sponge cake, sweetened with dates, and topped with rich toffee sauce. While its exact origin remains unclear, many believe it began in the Lake District, England. Chefs in country inns and hotels helped spread its popularity by adding it to their menus.
The Birth of Thumbprint Cookies
Thumbprint cookies, originally from Sweden, are known as “Hallongrotta,” meaning “raspberry cave.” Traditionally, bakers filled these buttery cookies with raspberry jam. Over time, they began experimenting with new fillings like chocolate, caramel, and now toffee, giving rise to creative cookie variations.
The Fusion of Two Classics
Sticky Toffee Pudding Thumbprints are a modern fusion of two beloved recipes. They combine the rich, caramel flavors of sticky toffee pudding with the soft texture of thumbprint cookies. This creative dessert offers a nostalgic yet exciting twist, perfect for those who love both classic treats.
Read more : Tailgate Tacos Recipe
Cultural Significance of Sticky Toffee Pudding Thumbprints
Sticky toffee pudding holds a cherished spot in British culture, often served during festive events and family gatherings. Meanwhile, thumbprint cookies are a staple in holiday baking traditions across Europe and North America. By blending these two classics, Sticky Toffee Pudding Thumbprints unite the comforting flavors of British cuisine with the playful charm of traditional cookies. This fusion reflects the evolution of modern baking, where flavors and traditions combine to create something new and delightful.
What Makes This Recipe So Irresistible?
- Rich, Caramel Flavor: The combination of browned butter, molasses, and dates creates a deep, toffee-like taste that’s both sweet and comforting.
- Perfect Texture: The cookies are soft and chewy with a slight crisp from the sugar coating, while the gooey toffee center adds a melt-in-your-mouth experience.
- Warm, Spiced Notes: Spices like nutmeg, cloves, and allspice add warmth and depth, making them perfect for cozy occasions.
- Creative Twist on Classics: This recipe fuses sticky toffee pudding and thumbprint cookies, offering a unique dessert that feels familiar yet exciting.
For full recipe instructions, check the original source here.
Sticky Toffee Pudding Thumbprints – A Chewy, Spiced Cookie with Gooey Toffee Filling
Description
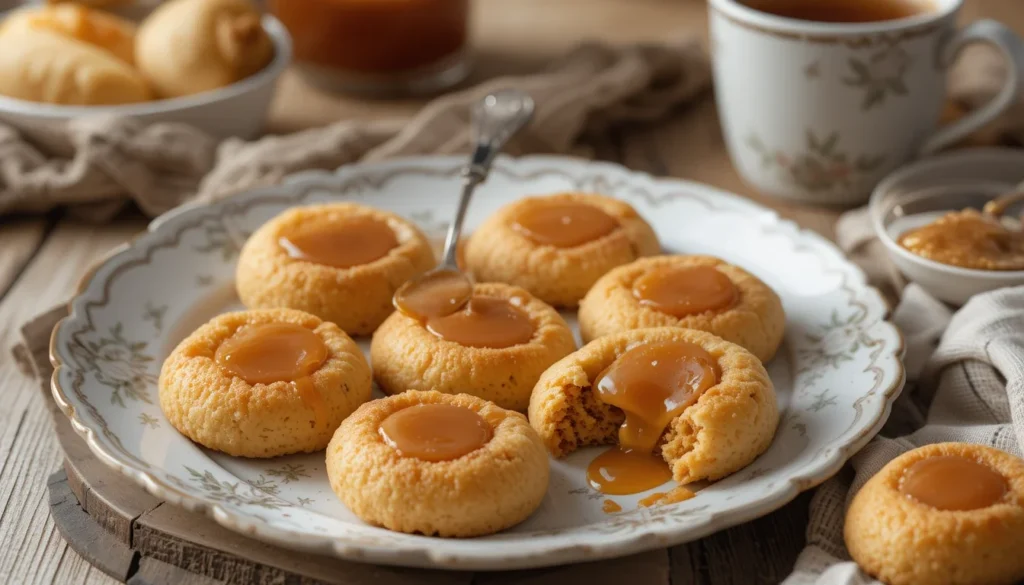
These Sticky Toffee Pudding Thumbprints blend soft, buttery cookies with rich, gooey toffee filling. Perfectly chewy and topped with powdered sugar, they offer a delightful fusion of dessert and cookie textures.
Ingredients
Instructions
1. Prepare the Dates
-
Place the dates into a small, heatproof bowl.
-
Pour boiling water over them until fully submerged.
-
Stir in the baking soda and let the dates soak for 10 minutes.
2. Brown the Butter
-
Add 1 cup of butter to a light-colored saucepan over medium-low heat.
-
Stir continuously until the butter turns a deep, fragrant brown (about 5–10 minutes).
-
Transfer the browned butter to a large mixing bowl and let it cool for 10 minutes.
3. Make the Date Paste
-
Drain the soaked dates.
-
Transfer them into a food processor or blender.
-
Pulse until the mixture forms a thick, paste-like consistency with just a few larger chunks remaining.
4. Combine Wet Ingredients
-
To the cooled browned butter in the mixing bowl, add:
-
Brown sugar
-
Molasses
-
Vanilla extract
-
Espresso powder
-
Salt
-
Nutmeg
-
Cloves
-
Allspice
-
Stir until the mixture is uniform.
-
Mix in the egg thoroughly, about 1 minute.
-
Add the date paste and stir until evenly distributed.
5. Incorporate Dry Ingredients
-
Stir in 1 ½ cups of flour along with the cornstarch and baking powder until just combined.
-
Gradually add the remaining 1 cup of flour, stirring only until the dough comes together.
6. Prepare the Sugar Coating
-
Measure out ½ cup of white sugar in a small bowl.
7. Shape the Cookies
-
Scoop approximately 1 tablespoon of dough and roll it into a ball.
-
Coat the dough ball completely by rolling it in the measured white sugar.
-
Press an indentation about ½-inch wide in the center using your thumb or the handle of a spoon, spatula, or small whisk.
-
Place each prepared cookie on a plate.
-
Continue this process with the remaining dough.
-
Refrigerate the shaped cookies for at least 30 minutes to firm up.
8. Bake the Cookies
-
Preheat the oven to 350°F (180°C).
-
Line baking sheets with silicone mats or parchment paper.
-
Arrange the chilled cookies on the baking sheets, leaving about 1 inch of space between each.
-
Bake for 12 to 14 minutes, until the cookies puff up and small cracks appear on their surface.
-
Immediately upon removal from the oven, gently press the center of each cookie with a utensil to create a flattened indentation.
-
Allow the cookies to cool on the baking sheet for 5 minutes, then transfer them to a wire rack to cool completely.
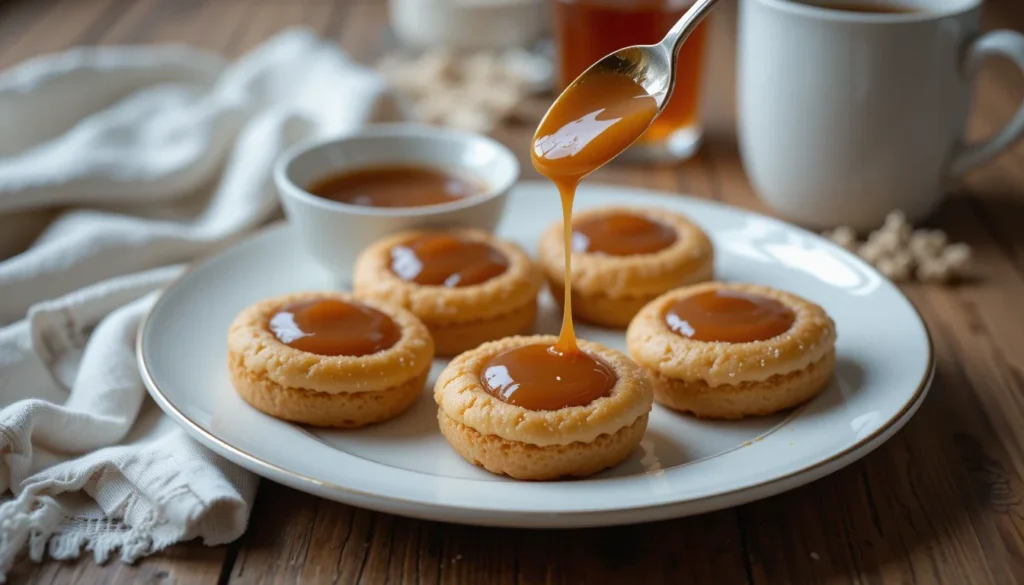
9. Prepare the Toffee Sauce
-
In a heavy-bottomed saucepan set over medium-low heat, combine:
-
Brown sugar
-
Butter
-
Water
-
Molasses
-
Salt
-
Stir continuously until the mixture reaches a boiling point.
-
Reduce the heat to low and continue boiling for 2 minutes, stirring constantly.
-
Carefully add the cream (be cautious of any sputtering) while stirring.
-
Return the mixture to a boil and cook for an additional 5 minutes, stirring constantly.
-
Remove the saucepan from the heat, then stir in vanilla extract and lemon juice.
-
Pour the sauce into a heatproof glass measuring cup with a pour spout and let it cool, stirring occasionally, until it thickens slightly (about 15 to 20 minutes).
10. Assemble and Store
-
Once the sauce has thickened slightly, carefully fill the center of each cooled cookie with the toffee sauce.
-
Take care not to overfill; alternatively, spoon the sauce into the indentations.
-
Store the finished cookies in a single layer in an airtight container.
Nutrition Facts
Servings 24
- Amount Per Serving
- Calories 150kcal
- % Daily Value *
- Total Fat 7g11%
- Saturated Fat 4g20%
- Cholesterol 25mg9%
- Total Carbohydrate 20g7%
- Dietary Fiber 1g4%
- Sugars 12g
- Protein 2g4%
* Percent Daily Values are based on a 2,000 calorie diet. Your daily value may be higher or lower depending on your calorie needs.
Note
1. Ingredient Insights
Dates:
The dates form the base of the flavor, providing natural sweetness and a sticky texture. Soaking them in boiling water with baking soda helps soften them and breaks down their fibers. This step is crucial for creating a smooth paste that blends seamlessly into the dough, giving the cookies their signature moistness and toffee-like taste.
Browned Butter:
Browning butter brings out a rich, nutty aroma that adds depth to the cookies' flavor. The process involves cooking the butter until the milk solids caramelize, giving it a golden hue and enhancing the toffee notes. Cooling the browned butter before mixing ensures it integrates smoothly with the other ingredients without cooking the eggs.
Spices:
A combination of nutmeg, cloves, and allspice infuses warmth into the cookies, balancing the sweetness from the dates and sugar. These spices elevate the flavor profile, giving the cookies a comforting, holiday-like feel.
2. Dough Preparation Techniques
Mixing the Dough:
After blending the dates into a thick paste, they’re mixed with the browned butter, sugars, and spices. The dough should be soft but not sticky. Incorporating the flour in stages ensures an even texture without overmixing, which could make the cookies tough.
Rolling and Shaping:
Rolling the dough balls in white sugar adds a subtle crunch to the outer layer. The thumbprint indentation is key—it creates a space for the toffee filling and ensures the cookies bake evenly. Using the handle of a spoon or spatula helps maintain a consistent shape.
Chilling the Dough:
Refrigerating the dough balls helps firm them up, preventing excessive spreading during baking. This step also intensifies the flavors as the ingredients meld together while resting.
3. Baking and Filling
Baking the Cookies:
The cookies should be baked until they puff up and develop small cracks, indicating they’re cooked through but still soft inside. Pressing down the indentations immediately after baking ensures enough space for the toffee filling without cracking the cookies.
Preparing the Toffee Sauce:
The toffee sauce is made from brown sugar, butter, molasses, and cream. Stirring constantly while it cooks prevents burning and ensures a smooth, glossy finish. Adding the cream carefully (as it will bubble) and letting the sauce cool slightly before filling prevents it from being too runny.
Filling the Cookies:
Once the cookies are cool and the sauce has thickened, carefully fill the centers. Overfilling can cause the sauce to spill, so it’s best to add just enough to reach the edges of the indentation.
4. Storage and Serving Tips
Storage:
Store the cookies in a single layer in an airtight container to prevent the toffee from sticking. They can be kept at room temperature for a couple of days or refrigerated for longer freshness.
Serving Suggestions:
These cookies are perfect for holiday gatherings or as an indulgent treat with tea or coffee. Warming them slightly before serving enhances the gooey texture of the toffee filling.
Cautions When Making Sticky Toffee Pudding Thumbprints
- Date Consistency: Ensure dates are fully softened before blending. Undersoftened dates can create a lumpy texture in the dough.
- Browning Butter: Watch the butter closely while browning. It can burn quickly once it starts to darken, affecting the flavor.
- Toffee Sauce Handling: When adding cream to the hot toffee mixture, pour slowly as it will bubble and sputter, posing a burn risk.
- Filling the Cookies: Don’t overfill the thumbprint centers with toffee sauce; it may spill over and make the cookies sticky.