
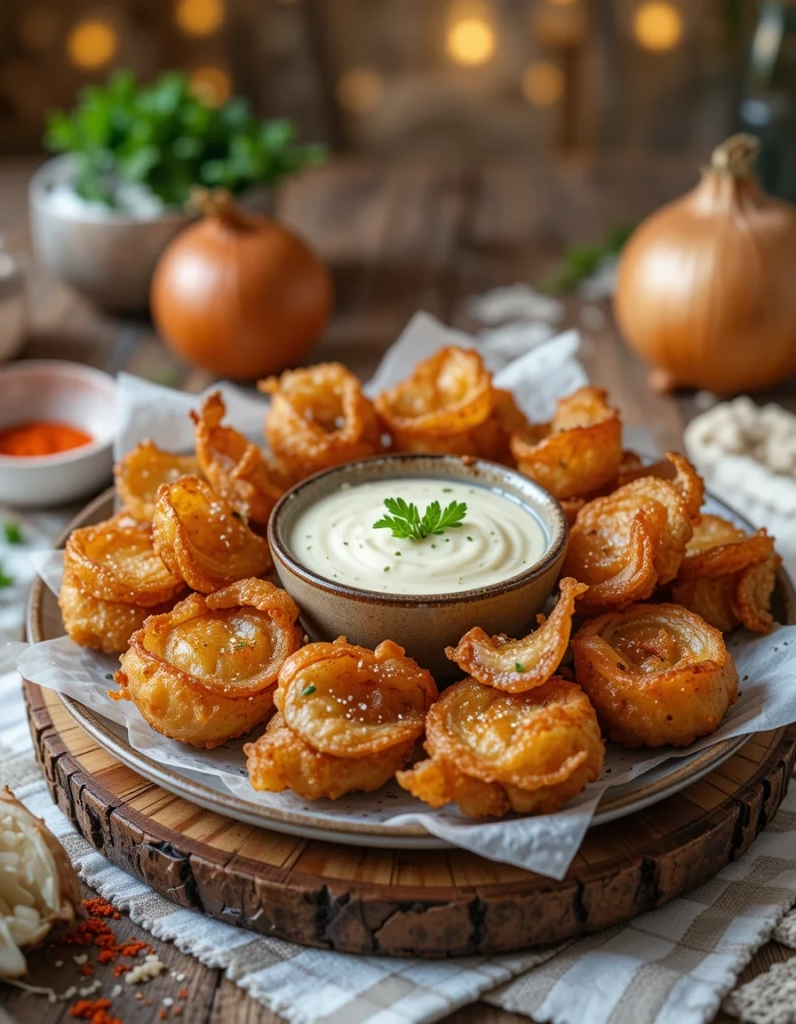

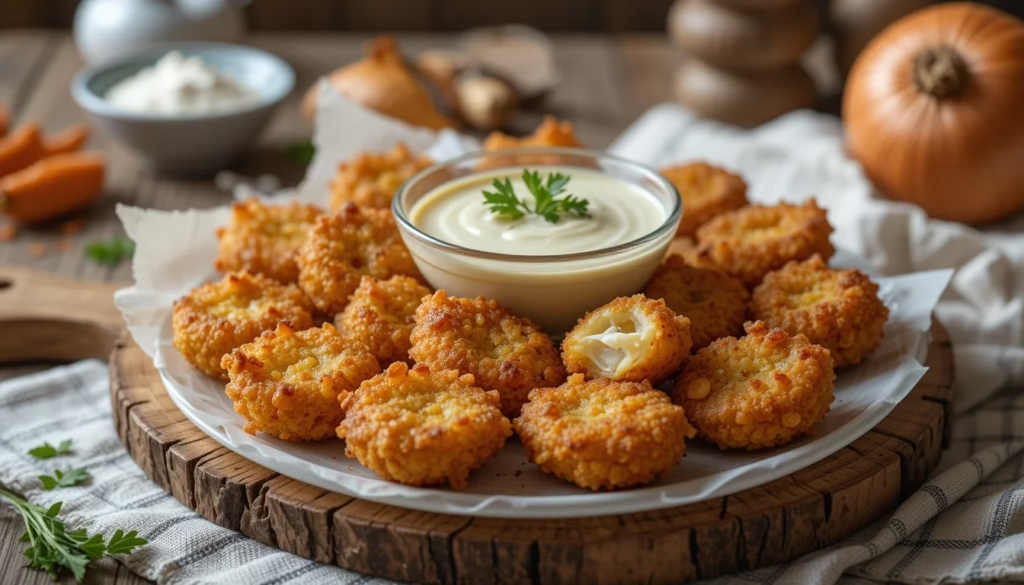
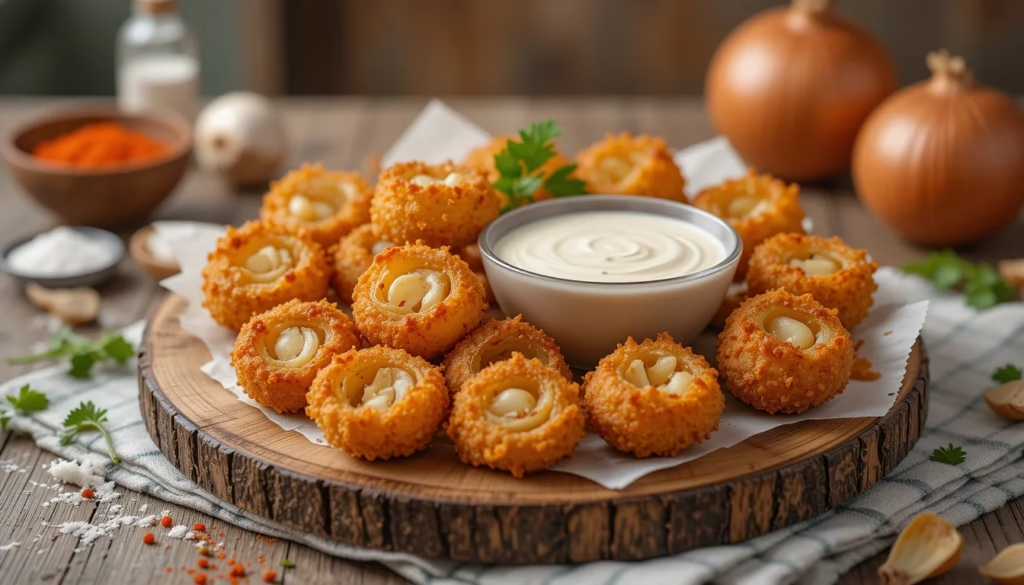
Crispy Blooming Onion Bites are a perfect snack for onion lovers. These bite-sized treats are golden, crunchy, and full of flavor. They are easy to make and taste just like restaurant-style blooming onions. The crispy coating locks in the sweetness of the onion, creating a delicious contrast. Paired with a creamy dipping sauce, they are great for parties, game nights, or a fun appetizer. You can enjoy them fresh and hot in just a few simple steps.
Benefits of This Recipe
1. Quick and Easy to Make
This recipe uses simple ingredients and takes just 15 minutes to prepare. You don’t need any special tools or cooking skills.
2. Crispy and Flavorful Texture
The Crispy Blooming Onion Bites have a crunchy coating with a soft, sweet onion inside. The seasoning blend adds a perfect balance of spice and taste.
3. Perfect for Sharing
These bite-sized onions are great for parties, gatherings, and game nights. Everyone can grab a piece and enjoy the delicious crunch.
4. Budget-Friendly Ingredients
The recipe uses basic and affordable ingredients that are easy to find. You can make a large batch without spending much.
5. Customizable to Your Taste
You can adjust the spice level, change the dipping sauce, or even bake them for a healthier option. This recipe is flexible and easy to modify.
6. Great Alternative to Restaurant Versions
Homemade Crispy Blooming Onion Bites taste just as good as restaurant versions, but they are fresh, less oily, and made with quality ingredients.
Read more : Fudgy Black Forest Bars – Easy Chocolate Dessert Recipe
Cautions
- Hot Oil Can Cause Burns – Be careful when frying. Use a deep pan and do not overcrowd.
- Overcrowding Lowers Oil Temperature – This can make the bites soggy instead of crispy. Fry in small batches.
- Check Oil Temperature – Too hot, and the coating will burn. Too cold, and the bites absorb oil. Keep it at 175°C (350°F).
- Onions Can Release Water – Pat them dry before coating to avoid a mushy texture.
- Consume While Fresh – These bites taste best when eaten hot. If stored, reheat in an air fryer or oven.
- Allergies to Dairy or Gluten – The batter contains flour and milk. Use gluten-free flour and dairy-free milk for alternatives.
Let me know if you need further refinements! 😊
History of Crispy Blooming Onion Bites
Origins of the Blooming Onion
The Crispy Blooming Onion Bites come from the famous Bloomin’ Onion, a deep-fried appetizer served in steakhouses. The original dish was created in the 1980s by a popular American restaurant chain. The goal was to make an onion look like a flower while keeping it crispy and flavorful.
Evolution into Bite-Sized Form
The full-sized Bloomin’ Onion was big and sometimes hard to eat. To make it easier, chefs created bite-sized versions that are crispy, fun, and perfect for dipping. These small bites give the same crunch and flavor but are much simpler to enjoy.
Inspiration from Fried Onion Recipes
Fried onions have been a part of different cuisines for centuries. In Indian cuisine, onion pakoras are a common street food. In American cooking, onion rings are a classic side dish. The Crispy Blooming Onion Bites bring the best of these flavors together in a fun and shareable snack.
Read more : Cheesy Ravioli Lasagna: A Delicious Twist on Classic Comfort Food
Cultural Significance of Crispy Blooming Onion Bites
A Classic American Appetizer
The Crispy Blooming Onion Bites are a favorite in the United States, especially in steakhouses and sports bars. They are often served as a starter before a meal or as a snack during big events like Super Bowl parties.
Perfect for Social Gatherings
People love Crispy Blooming Onion Bites because they are easy to share. Whether at family dinners, game nights, or BBQ parties, they bring people together. The crispy texture and flavorful dipping sauce make them an instant favorite.
Similar Dishes Around the World
Many cultures have their own version of fried onions. In Spain, fried onion rings called “aros de cebolla” are common. In Japan, tempura onions are a light and crispy snack. The Crispy Blooming Onion Bites fit right into this tradition of crispy, deep-fried onion snacks.
A Modern Twist on a Classic Recipe
Today, Crispy Blooming Onion Bites can be customized with different spices, coatings, and dipping sauces. Some people bake or air-fry them for a healthier option. No matter how they are made, they remain a beloved comfort food.
Would you like any adjustments or more details? 😊
Crispy Blooming Onion Bites – Perfect Crunchy Snack Recipe
Description
These bite-sized blooming onion pieces are deep-fried to golden perfection, offering a crispy and flavorful appetizer. Served with a tangy and slightly spicy dipping sauce, they are perfect for parties, game nights, or as a snack.
Ingredients
For the Onion Bites:
For the Dipping Sauce:
Instructions
1. Prepare the Dipping Sauce
-
Take a small mixing bowl and add sour cream, mayonnaise, ketchup, prepared horseradish, smoked paprika, and cayenne pepper.
-
Use a whisk or spoon to mix everything until it is completely smooth and well combined.
-
Taste the sauce and adjust the seasoning if needed. If you prefer more heat, add an extra pinch of cayenne pepper.
-
Cover the bowl with plastic wrap or a lid and refrigerate for at least 15 minutes to allow the flavors to meld together.
2. Prepare the Onions
-
Take 2 cups of yellow onions and peel off the outer skin.
-
Dice the onions into small, bite-sized pieces to ensure even frying. Avoid cutting them too small, as they might break apart during cooking.
-
Place the diced onions in a medium bowl and sprinkle 1 teaspoon of kosher salt over them.
-
Let the onions sit for 5 minutes to draw out excess moisture, which helps achieve a crispier texture.
-
After 5 minutes, use a paper towel or clean kitchen towel to pat the onions dry, removing as much excess moisture as possible.
3. Prepare the Dry Coating
-
In a large mixing bowl, combine the following dry ingredients:
-
1 cup all-purpose flour
-
1 tablespoon cornmeal (for extra crispiness)
-
½ teaspoon baking powder (helps with lightness)
-
½ teaspoon black pepper
-
¼ teaspoon cayenne pepper (adjust for spice level)
-
½ teaspoon garlic powder
-
¼ teaspoon smoked paprika
-
A pinch of kosher salt
-
Use a whisk or spoon to thoroughly mix the ingredients, ensuring even distribution of seasoning.
4. Prepare the Wet Batter
-
In a separate bowl, crack 1 large egg and beat it lightly with a whisk.
-
Pour in 1 cup of whole milk and whisk together until the mixture is smooth and fully combined.
-
This wet batter will help the flour coating stick to the onions, ensuring a crispy exterior.
5. Coat the Onions
-
Take the diced onions and toss them into the dry flour mixture first.
-
Shake the bowl or use your hands to ensure all onion pieces are fully coated with the dry mixture.
-
Using a slotted spoon, transfer the coated onions into the wet batter and mix well to coat evenly.
-
Lift the onions out of the wet batter and let any excess liquid drip off before transferring them back into the dry flour mixture.
-
Toss them once again in the flour mixture to create a thick, crispy coating.
-
This double-coating process ensures the bites have an extra crispy texture.
6. Heat the Oil for Frying
-
In a deep fryer, heavy-bottomed pot, or Dutch oven, pour in enough vegetable oil to submerge the onion bites completely (about 2-3 inches deep).
-
Heat the oil to 175°C (350°F). Use a cooking thermometer to maintain the correct temperature.
-
If you don't have a thermometer, test by dropping a small piece of batter into the oil—if it sizzles and rises immediately, the oil is ready.
7. Fry the Onion Bites
-
Carefully place small batches of coated onion bites into the hot oil using a slotted spoon. Avoid overcrowding the pan, as this will lower the oil temperature and result in soggy bites.
-
Fry the onion bites for 2-3 minutes, stirring occasionally to ensure even browning.
-
Once they turn golden brown and crispy, use a slotted spoon to remove them from the oil.
-
Transfer them to a plate lined with paper towels to absorb excess oil.
-
Repeat the frying process until all onion bites are cooked.
8. Serve and Enjoy
-
Place the crispy onion bites onto a serving platter.
-
Pour the chilled dipping sauce into a small bowl and serve it on the side.
-
Optionally, garnish with chopped fresh parsley or chives for added color and freshness.
-
Serve immediately while hot and crispy for the best taste and texture.
Nutrition Facts
Servings 4
- Amount Per Serving
- Calories 320kcal
- % Daily Value *
- Total Fat 18g28%
- Saturated Fat 3g15%
- Cholesterol 25mg9%
- Total Carbohydrate 35g12%
- Dietary Fiber 2g8%
- Sugars 3g
- Protein 6g12%
* Percent Daily Values are based on a 2,000 calorie diet. Your daily value may be higher or lower depending on your calorie needs.
Note
1. Origin and Inspiration
The Awesome Blossom Onion Bites are inspired by the famous “Bloomin’ Onion” served in steakhouses and casual dining restaurants. Instead of a whole onion, this recipe transforms the classic dish into bite-sized, shareable pieces, making it easier to eat and perfect for dipping. The crispy batter and flavorful seasoning create a mouthwatering appetizer that’s great for parties, gatherings, or a fun snack.
2. Importance of the Right Onion Choice
Choosing the right type of onion significantly impacts the flavor and texture of the dish.
- Yellow onions are the best choice because they have a balance of sweetness and sharpness that deepens as they cook.
- White onions can also be used for a milder flavor, while red onions add a slight tanginess but may alter the overall taste.
- Sweet onions like Vidalia onions can provide a naturally sweeter bite, which pairs well with the spicy seasoning.
3. The Secret to a Perfect Crispy Coating
The key to achieving an ultra-crispy texture lies in the double-coating technique:
- First, the onion bites are tossed in a dry flour mixture to create a base layer for the batter to adhere to.
- Then, they are dipped into the wet batter, which provides moisture and helps form a thicker crust.
- Finally, they are tossed back into the dry flour mixture, ensuring a light, crunchy texture when fried.
Additionally, using cornmeal in the coating adds extra crispiness and prevents the bites from becoming too greasy.
4. Frying Tips for the Best Results
Frying can make or break the dish. Here’s how to get perfectly crispy onion bites:
- Use fresh oil – Old oil can alter the taste and reduce crispiness.
- Maintain oil temperature at 175°C (350°F) – If the oil is too hot, the outside will burn before the inside is cooked; if too cool, the bites will absorb too much oil and become greasy.
- Fry in small batches – Overcrowding lowers the oil temperature, leading to uneven cooking.
- Drain properly – Use a slotted spoon to remove the bites and place them on paper towels or a wire rack to remove excess oil.
5. How to Make It Less Greasy
- Use a wire rack instead of a plate lined with paper towels to allow air circulation, preventing the bites from sitting in excess oil.
- Opt for a neutral oil with a high smoke point, such as vegetable oil, canola oil, or peanut oil, for better frying results.
6. Customization Ideas
This recipe is incredibly versatile, and you can adjust it to suit different preferences:
For Extra Spice:
- Increase the cayenne pepper or add a pinch of red chili flakes to the batter.
- Serve with a spicy dipping sauce, such as sriracha mayo or chipotle aioli.
For a Smoky Flavor:
- Add an extra ½ teaspoon of smoked paprika to the flour mixture.
- Serve with a BBQ-flavored sauce.
For a Healthier Version:
- Instead of deep-frying, bake the onion bites in an air fryer at 200°C (400°F) for 10-12 minutes until golden brown.
- Use a whole wheat flour blend for added fiber.
7. Best Dipping Sauces to Pair With
While the provided sauce is a classic combination of sour cream, mayo, and horseradish, here are some alternative dipping sauces:
- Ranch dressing – A creamy and herby option.
- Chipotle aioli – Adds a smoky, spicy kick.
- Honey mustard – Sweet and tangy, perfect for contrast.
- Garlic parmesan dip – Rich and cheesy for extra indulgence.
8. Storage and Reheating Tips
If you have leftovers, follow these tips to maintain crispiness:
- Refrigeration: Store in an airtight container in the fridge for up to 2 days.
- Reheating:
- Avoid microwaving, as it will make them soft and soggy.
- Instead, reheat in an oven at 180°C (350°F) for 5-7 minutes or use an air fryer at 200°C (400°F) for 3-4 minutes to restore crispiness.
9. Serving Suggestions
These crispy onion bites are perfect for:
- Game night appetizers with wings and sliders.
- Side dish for burgers or sandwiches.
- Snack for movie nights or parties.
- Pairing with fresh salads for a crunchy contrast.
10. Dietary Considerations
This recipe can be adjusted for different dietary needs:
- Vegetarian-Friendly: ✔ (As long as all ingredients are plant-based).
- Dairy-Free Option: Use dairy-free mayonnaise and sour cream in the dipping sauce.
- Gluten-Free Option: Substitute gluten-free flour and ensure that the baking powder is gluten-free.