

Rice and Beans Burritos are a simple, tasty, and filling meal for any time of the day. They are made with soft tortillas, seasoned rice, and protein-rich beans. These burritos are budget-friendly, easy to prepare, and great for meal prep.
You can freeze them for later or enjoy them fresh with your favorite toppings. They are perfect for busy days when you need a quick and satisfying meal. Whether for lunch, dinner, or a snack, these burritos will keep you full and energized.
Benefits of This Recipe
- High in Protein – Beans provide plant-based protein, keeping you full longer.
- Rich in Fiber – Rice and beans support digestion and improve gut health.
- Budget-Friendly – Uses simple and affordable ingredients found in most kitchens.
- Easy to Make – Requires minimal cooking skills and comes together quickly.
- Freezer-Friendly – Can be made in bulk and stored for quick meals later.
- Customizable – Add veggies, cheese, or spices to suit your taste.
- Great for Meal Prep – Saves time by preparing multiple servings in advance.
- Kid-Friendly – A mild and tasty option that kids will enjoy.
- Vegetarian Option – Naturally meat-free but still packed with nutrients.
- No Fancy Equipment Needed – Just a pan, some ingredients, and a few minutes.
Read more : Air Fryer Honey Mustard Salmon – Easy & Healthy Recipe

Cautions
- Watch the Salt – Beans and cheese can add extra sodium, so balance accordingly.
- Avoid Overfilling – Too much filling can cause the burrito to break when rolling.
- Proper Storage Needed – Wrap burritos tightly before freezing to prevent freezer burn.
- Reheat Properly – Overheating in the microwave can make the tortilla chewy.
- Choose the Right Tortilla – Some tortillas tear easily, so use fresh and flexible ones.
- Check for Allergens – If serving guests, be aware of dairy or gluten sensitivities.
Read more : Boxty Irish Potato Pancakes – Crispy & Traditional Recipe

Fun Tidbits About Rice and Beans Burritos
- A Global Favorite – Rice and beans are a staple in many cultures, from Mexico to the Caribbean.
- Accidental Freezer Meal – People first started freezing burritos by accident, and it turned into a meal-prep hack!
- The Perfect Balance – Rice gives you energy, while beans provide protein and fiber—an ideal combo.
- Tortilla or Napkin? – In some cultures, tortillas were used as edible plates before forks and spoons became common.
- Endless Customization – From spicy jalapeños to creamy avocado, you can make each burrito unique.
- Best On-the-Go Meal – Burritos are called “handheld meals” because you don’t need plates or utensils.
- The Name Means “Little Donkey” – “Burrito” in Spanish means “little donkey.” Some say it’s because burritos carry so much filling like a donkey carries a load.
- A Street Food Classic – Burritos became popular as Mexican street food before making their way worldwide.
- No Fancy Skills Needed – If you can roll a wrap, you can make a burrito!
- Great for Sharing – Whether for a picnic, road trip, or family meal, burritos bring people together.
Easy Rice and Beans Burritos Recipe – A Health & Friendly Meal
Description
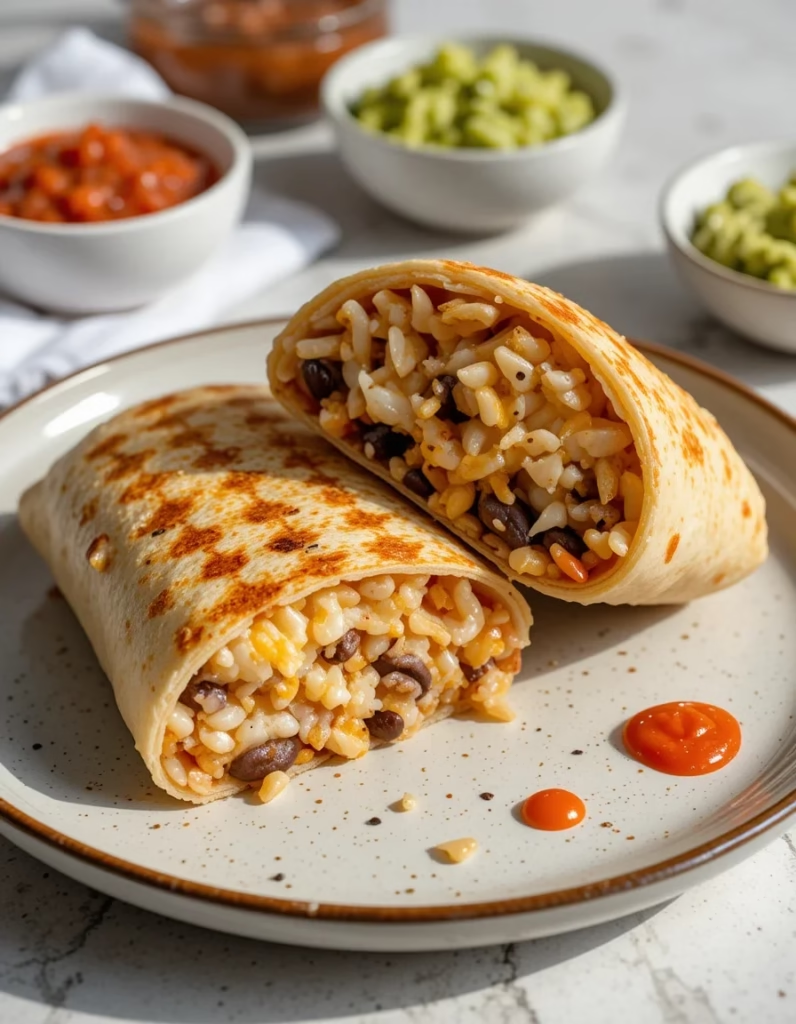
These Easy Rice and Beans Freezer Burritos are a perfect make-ahead meal, ideal for busy days. Made with soft tortillas filled with flavorful cilantro-lime rice, hearty pinto beans, melty cheddar cheese, and salsa, these burritos are simple, nutritious, and budget-friendly. Store them in the freezer and reheat for a quick, satisfying meal anytime!
Ingredients
For the Burritos:
For Freezing & Storing:
Instructions
1. Cooking the Rice
-
Rinse the rice under cold water until the water runs clear.
-
Cook the rice according to the package instructions, using a 1:2 rice-to-water ratio for fluffy grains.
-
Once cooked, let it sit covered for 5 minutes to absorb any remaining moisture.
-
Fluff the rice with a fork and transfer it to a mixing bowl.
2. Seasoning the Rice
-
While the rice is still warm, add chopped cilantro, ground cumin, garlic powder, salt, and black pepper.
-
Stir well to combine the flavors evenly.
-
Taste and adjust seasoning if needed.
3. Preparing the Beans
-
Drain and rinse the pinto beans to remove excess sodium and starch.
-
Lightly mash half of the beans using a fork to create a creamy yet textured consistency.
-
Keep the other half of the beans whole for a mix of textures in the burritos.
-
If preferred, heat the beans in a pan with a splash of water and seasoning for extra flavor.
4. Prepping the Tortillas
-
Warm each tortilla on a dry skillet over medium heat for 10–15 seconds per side.
-
This softens the tortillas and prevents cracking when rolling the burritos.
-
Stack the warmed tortillas on a plate and cover them with a clean kitchen towel to keep them soft.
5. Assembling the Burritos
-
Lay one tortilla flat on a clean surface.
-
Add ¼ cup of seasoned rice in the center, leaving about 1-inch space from the edges.
-
Spoon ¼ cup of beans evenly over the rice.
-
Sprinkle 2-3 tablespoons of shredded cheddar cheese on top.
-
Drizzle a spoonful of salsa over the cheese.
-
Make sure not to overfill to prevent difficulty in rolling.
6. Folding the Burritos
-
Fold the sides of the tortilla inward over the filling.
-
Fold up the bottom edge, rolling it tightly over the filling.
-
Continue rolling until you reach the top edge, creating a secure burrito.
-
Press down gently to keep it sealed.
7. Wrapping for Freezing
-
Place the burrito seam-side down on a piece of parchment paper or aluminum foil.
-
Wrap it tightly, making sure no air pockets remain.
-
If using parchment paper, secure the ends by folding them inward like a gift wrap.
-
Place the wrapped burritos inside a freezer-safe ziplock bag.
-
Label the bag with the date before placing it in the freezer.
8. Freezing the Burritos
-
Lay the wrapped burritos flat in the freezer so they freeze evenly.
-
Once fully frozen, stack them neatly to save space.
-
Burritos can be stored in the freezer for up to 3 months.
-
Reheating Instructions
-
1. Microwave Method (From Frozen)
-
Unwrap the burrito and place it on a microwave-safe plate.
-
Wrap it in a damp paper towel to retain moisture.
-
Microwave for 1½ to 2 minutes, flipping halfway.
-
Let it rest for 30 seconds before eating.
-
2. Oven Method (From Frozen)
-
Preheat the oven to 180°C (350°F).
-
Place the burritos on a baking sheet and cover loosely with foil.
-
Bake for 20 minutes, flipping once halfway through.
-
Remove from the oven, let it cool for 1-2 minutes, then serve.
-
3. Skillet Method (From Refrigerated)
-
Heat a dry skillet over medium heat.
-
Place the burrito seam-side down and cook for 2-3 minutes per side.
-
Flip carefully until the tortilla is golden brown and the filling is heated through.
Nutrition Facts
Servings 6
- Amount Per Serving
- Calories 380kcal
- % Daily Value *
- Total Fat 12g19%
- Saturated Fat 6g30%
- Cholesterol 25mg9%
- Total Carbohydrate 50g17%
- Dietary Fiber 9g36%
- Sugars 3g
- Protein 15g30%
* Percent Daily Values are based on a 2,000 calorie diet. Your daily value may be higher or lower depending on your calorie needs.
Note
Why This Recipe Works
These Easy Rice and Beans Freezer Burritos are perfect for meal prep and busy days. They are simple to make, budget-friendly, and packed with fiber and protein. Whether you're looking for a quick lunch, a post-workout meal, or a late-night snack, these burritos are a convenient option.
Customizing the Recipe
1. Protein Variations
- Add Chicken or Beef – For a non-vegetarian version, add shredded halal chicken or cooked ground beef.
- Use Black Beans or Chickpeas – Swap pinto beans with black beans, kidney beans, or chickpeas for variety.
2. Cheese Alternatives
- If avoiding dairy, use a plant-based cheese substitute or skip cheese altogether.
- Opt for Monterey Jack or Pepper Jack cheese for an extra kick of flavor.
3. Spice Adjustments
- Add chili powder or smoked paprika to make the burritos spicier.
- For a milder taste, reduce cumin and garlic powder and use a mild salsa.
4. Extra Fillings
- Include avocado slices, sautéed peppers and onions, or fresh lettuce when serving fresh.
- A dollop of Greek yogurt can be used instead of sour cream.
Best Way to Store These Burritos
- Short-term storage: Keep in the fridge for up to 3 days in an airtight container.
- Long-term storage: Freeze for up to 3 months wrapped individually in foil or parchment paper inside a ziplock bag.
How to Prevent Sogginess
- Ensure the rice is completely cooled before assembling the burritos.
- Drain beans properly to avoid excess moisture.
- If reheating in the microwave, avoid overheating as it can make the tortilla chewy.
Serving Suggestions
- Serve with fresh guacamole, pico de gallo, or sour cream for added flavor.
- Pair with a side of tortilla chips and salsa for a more complete meal.
- Enjoy with a fresh green salad for a balanced plate.
Why This is a Great Freezer Meal
- Saves time: Prepping these burritos in bulk ensures quick, easy meals for weeks.
- Cost-effective: Uses simple, affordable pantry ingredients.
- Nutritious: High in fiber, protein, and healthy carbs, keeping you full longer.